Partner Integrations: ProtoTech Solutions Serialization
3DIAX allows companies to provide tools that can be used by user. The provider can also determine how to share their tool. ProtoTech Solutions has integrated their tools to provide a service for serializing 3d models. In this tutorial we will go over how to create a transformation job and transform a 3DIAX model into a serialized model.
Provider Services
First we need to figure out what services are available and find the serialization service. We can do this by hitting the services endpoint.
To do this we need to authenticate. You can use the placeholders in the example curl command. You can also reference the Client Authentication on how to authenticate to the 3DIAX API.
curl "https://data.authentise.com/service/" \
  -u "<api_token>:<api_secret>" \
  -H "Content-Type: application/json"
This endpoint will return similar to the following:
{
  "resources": [{
    "type": "file-conversion",
    "uri": "https://data.authentise.com/service/7881ce9f-3226-47d7-9df2-8efce12f566f/",
    "name": "Prototech Serializations",
    "service_method": "POST",
  }]
}
In the response JSON we can see the service that we want to use: Prototech Serializations. So let’s take note of the service URI which is: https://data.authentise.com/service/7881ce9f-3226-47d7-9df2-8efce12f566f/.
Preparing a Model for Operation
We need to prepare a model for serialization. A model must have a “domain” declared. A domain defines where text will be operated on. The domain must be a rectangular prism. The bottom 4 points of the rectangular prism must be inside the model. Their depth from the model surface will determine the depth of the serial text added to the model.
Below is an example of a model I want to serialize:

Below is an example of the same model as before, with a domain specified:
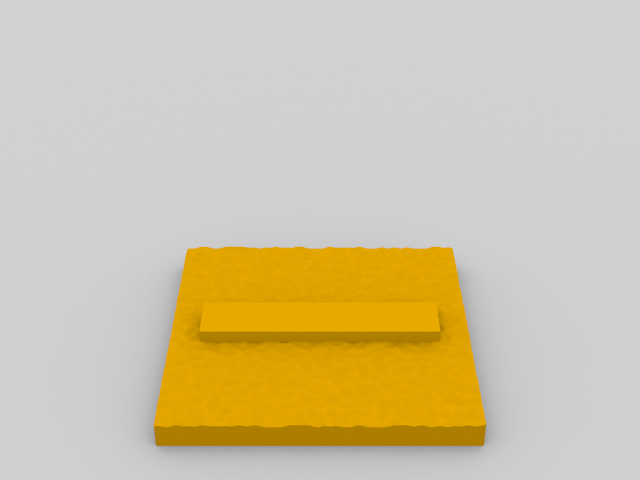
Now that we have defined our domain, we save the the model, along with the domain in an obj file. The domain will be identified as the object in the obj file
that has 8 vertices. This will fail if you attempt to use a rectangular prism as both the domain and the object to receive a serial number.
Use the Tutorial for information on uploading a model into the system, and set the model type to obj. Once the model creation process is complete, the status will be inoperable, because core authentise doesnt have any features for obj, but thats fine, because by the end of the operation, you will have a usable, serializable, resource.
Creating an Operation
We will create an operation based on the model resource we just created, but for this example we will use https://data.authentise.com/model/da38a1fb-bb84-4f3c-aaae-a545f1bd7dff/ as the model URI. We also need the service URI that we got in the previous step.
To create a new operation we hit the operation API endpoint with the following, as an example payload for the POST request:
{
  "service": "https://data.authentise.com/service/7881ce9f-3226-47d7-9df2-8efce12f566f/",
  "inputs": {
      "model": "https://data.authentise.com/model/da38a1fb-bb84-4f3c-aaae-a545f1bd7dff/",
  },
  "parameters": {
      "text": "abc123",
  },
  "callback": {
    "method": "POST",
    "url": "https://example.com/operation/complete/"
  }
}
Looking at the example payload you can see the service parameter which is the service URI. The input parameters contain specific parameters to the type of service. For example: A file conversion service requires a model parameter in the inputs which tells it what model to use for the operation. Another type of service might require different parameters in the inputs to complete the operation. Currently serialization is marked as a file-conversion type, which will require the parameters like the example payload.
You might have noticed a parameters object in the payload. This is custom parameters that the service requires. The provider will sometimes need custom configuration settings to complete the operation. This service requires a property called text. This will be the string serialized into the model.
We can include an optional parameter callback for the operation which will be called when the operation is complete. This is useful as it avoids having to poll the operation resource to check its status. In this case we should expect a POST to the https://example.com/operation/complete/ URL once the operation is complete. You can read more about callbacks in Callback Service.
Now that we have our payload we can create an operation. We do that by using a POST request on the operation API with the payload from the above example:
curl "https://data.authentise.com/operation/" \
  -X POST \
  -u "<api_token>:<api_secret>" \
  -H "Content-Type: application/json" \
  -d '{ "service": "https://data.authentise.com/service/7881ce9f-3226-47d7-9df2-8efce12f566f/", "inputs": { "model": "https://data.authentise.com/model/da38a1fb-bb84-4f3c-aaae-a545f1bd7dff/" }, "parameters": {"text": "abc123"}}' \
  -v
3DIAX will check to make sure the user has access to perform the operation using the specified service. It will also check to make sure the user has access to the model for the model-transformarion type service.
A successful response status code will return a 204. In the response there will be a Location header. This is the URI for the newly created operation. For this example we can use: https://data.authentise.com/operation/73d4f855-6691-4ae3-bad7-e125550ad3bf/.
Getting the status of an Operation
Once we know the operation’s URI we can get the current status and any other information about the operation by making a GET request to the operation’s URI. An example CURL request for this is:
curl "https://data.authentise.com/operation/73d4f855-6691-4ae3-bad7-e125550ad3bf/" \
  -u "<api_token>:<api_secret>" \
  -H "Content-Type: application/json"
Using this request a response would look like this:
{
  "uri": "https://data.authentise.com/operation/73d4f855-6691-4ae3-bad7-e125550ad3bf/",
  "service": "https://data.authentise.com/service/7881ce9f-3226-47d7-9df2-8efce12f566f/",
  "inputs": {
    "model": "https://data.authentise.com/model/da38a1fb-bb84-4f3c-aaae-a545f1bd7dff/"
  },
  "parameters": {
    "text": "abc123"
  },
  "status": "processing",
  "outputs": null,
  "results": null
}
If you look at the status in the response json we can see that the operation is still processing.
We can try this same call again until we get a complete or failure status. If the operation fails the outputs object might contain helpful information about why it failed from the provider’s service. Here is an example error status from Prototech.
{
  "uri": "https://data.authentise.com/operation/73d4f855-6691-4ae3-bad7-e125550ad3bf/",
  "service": "https://data.authentise.com/service/7881ce9f-3226-47d7-9df2-8efce12f566f/",
  "inputs": {
    "model": "https://data.authentise.com/model/da38a1fb-bb84-4f3c-aaae-a545f1bd7dff/"
  },
  "parameters": {
    "text": "abc123"
  },
  "status": "error",
  "outputs": {
    "title": "Incorrect input file format",
    "code": "13"
  },
  "results": null
}
A complete status will include a results object in the response. This will include the results of the completed operation.
{
  "uri": "https://data.authentise.com/operation/bc53d17e-dad6-4bc5-af4e-b6f9806a1fac/",
  "service": "https://data.authentise.com/service/7881ce9f-3226-47d7-9df2-8efce12f566f/",
  "inputs": {
    "model": "https://data.authentise.com/model/da38a1fb-bb84-4f3c-aaae-a545f1bd7dff/"
  },
  "parameters": {
    "text": "abc123"
  },
  "status": "complete",
  "outputs": {
    "content": "https://ptsbucket.s3.amazonaws.com/da38a1fb-bb84-4f3c-aaae-a545f1bd7dff?AWSAccessKeyId=AKIAJAHHABIBFQYVLGIQ&Expires=1452187869&Signature=ZmeyadUbHR%2BGTf8rX%2BN7kcb3dro%3D"
  },
  "results": "https://data.authentise.com/model/9faa7c75-67ea-4331-82e4-fac56055da06/"
}
Depending on the service type, the contents of results will be different. For our file-conversion type, it contains a URI for the new model that was created after the transformation was complete. We can use that to get a download link to the actual model file by running a GET request against the model URI.
curl "https://data.authentise.com/model/9faa7c75-67ea-4331-82e4-fac56055da06/" \
  -u "<api_token>:<api_secret>" \
  -H "Content-Type: application/json"
The response from the model endpoint will look like this:
{
  "uri": "https://data.authentise.com/model/9faa7c75-67ea-4331-82e4-fac56055da06/",
  "name": "cube",
  "type": "stl",
  "content": "https://prod-hoth-data.s3.amazonaws.com:443/9faa7c75-67ea-4331-82e4-fac56055da06?Signature=hzjOUZuXSiZp1LBAtKJrJyzXYPA%3D&Expires=1452188134&AWSAccessKeyId=AKIAIXWYOAMWDK2U3WJQ",
  "status": "processed"
}
You can see the download URL in the response payload. We can make a GET request against that URL to download the new stl file.
curl https://prod-hoth-data.s3.amazonaws.com:443/9faa7c75-67ea-4331-82e4-fac56055da06?Signature=hzjOUZuXSiZp1LBAtKJrJyzXYPA%3D&Expires=1452188134&AWSAccessKeyId=AKIAIXWYOAMWDK2U3WJQ \
  -o AuthentiseLogoSerialized.stl
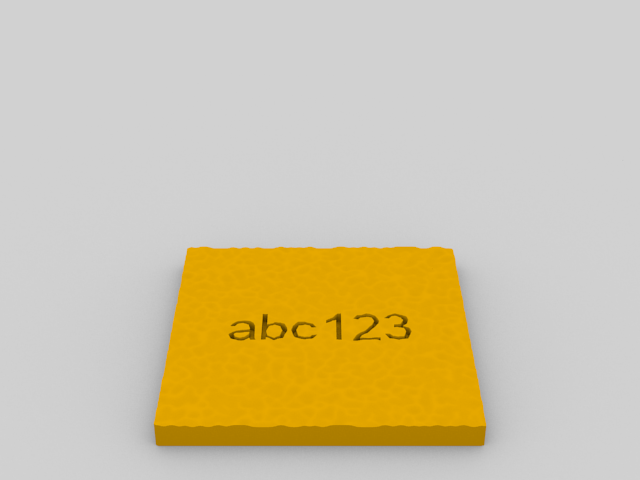
Now we can open the transformed model in your preferred model viewer, and see the serialized text in the location we specified:
Conclusion
Now you have your finished serialization transformation. Using the information in this tutorial you can learn to use any service that is being provided in 3DIAX.